Introduction Greetings everyone who will ever reach this document, I welcome you to kick back, grab a cup of tea/coffee and learn about a new(ish) workflow that Thromp, Bad Benson and I developed over the course of a few days.
To be totally fair, most of the work was done by Thromp, so he deserves the highest of praises, a thousand virgins should suffice to please him.
There are some caveats to this workflow, it can get buggy if things aren't done correctly, it will not work 100% of the time, but we have had the most success with this workflow when custom rigs are concerned, so things like dancing worms, dinosaurs, giant mecha or custom animals are entirely possible.
With a bit of luck, the community will pool together to improve this work-flow, so without further ado, let's get started!
This tutorial covers custom animations for the Arrna 3 dude, I won't be covering how to create custom skeletons here, but Bad Benson will be working on something along those lines, so expect something soon. This tutorial also assumes that you know how to animate within 3DS Max.
Código:
Make sure to move up the skeleton so the feet are at the grid origin, otherwise the character will be halfway in the ground ingame. This needs to be done on frame 1.
Then you'll need to grab the Rig I made to animate with, of course, you don't have to use my Rig, I will also provide the skeleton I had to make for .3DS compatability, which you can use to make your own rigs.
The rig and skeleton come in 2010, 11, 12, 13 3DS Max compatabilities, unfortunately I couldn't go any further back than that.
STEP 2
Load up the Rig in 3DS Max, or make your own, do your business with animation, now to export your animation you need to select all the bone names of the original skeleton.
You can make this easier by pressing "Select by name".
This button right here.
This dialogue is what will appear, next you need to select all the bones that Arma 3 recognizes for the human skeleton.
Once that's done, you need to export as .3DS, to do that, we need to go to "Export", then "Export selected" which will only export the bones that you have selected.
Under "Save as type", choose .3DS. Then call it whatever you want, save out to whatever directory you are working with. Job done
Let's move on to 02!
STEP 3 Time to load up 02, get it done! Once 02 has booted up, we need to import the .3DS file that we saved out, go to "file", "Import", then "import 3D Studio", find the .3DS you saved out of max and import it.
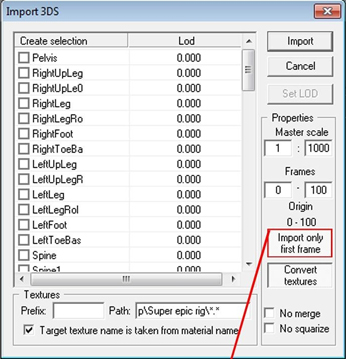
Once imported, this window will open, this stage is very important if you want your animations to appear.
You need to select every bone in this list, it's easier if you move the slider all the way to the bottom, click and drag left mouse button upwards and it should highlight all of the bones, then click the checkbox next to "Pelvis", that will select all of the bones for you.
Once all of your bones have been selected, there is a button you absolutely must disable before doing anything else, THIS badboy right here. Disabling this button will import all of your animated frames, rather than importing just the first frame, which is generally the "T-Pose", sometimes referred to as the ragdoll pose.
There are some other options you may want to play with to keep things clean, such as "Frames", the 0 represents your first frame, the "T-Pose", the second digits represent all the frames afterward, so if your animation is 40 frames, change the default "100" to 40 etc.
The scaling when exporting .3DS out of Max is spot on, so you won't need to change the "Master Scale" setting.
When you are ready, press "Import". You may get an error about textures, you can ignore this as it's completely unimportant.
Now that is done, the bones that you imported should appear in the main main viewport. If you haven't already configured 02 to display the animation track bar, you can do that by pressing "Window", then "Animations, and your frames will appear in a new animation window.
Highlight the first frame in this animation window and press the down arrow key on your keyboard, if you followed these steps correctly, then your animation will play in the viewport where you can see your bones.
Congrats! You have now successfully imported an animation in 02, but it's not over yet, there is still some clean up work to be done in order for things to work correctly.
STEP 4
Now, you may have noticed that some of the bones you imported have incorrect or shortened names, this is because the .3DS format is a binary format, and doesn't like long names, to fix this we must rename all of the bones that got borked in the export process, but before we do that, we must export the the animation.
In the animation window that contains all of your frames, right click anywhere in there and then select "Auto Time 1.0", I have no idea why this is needed, but Thromp told me this step was necessary, so we do it. With that done, right click in the animation window again, then select "Export Matrices" down at the bottom.
Save this out to the folder you are working with, if you get an error that says "The File name is not valid", then you need to add ".rtm" after what you call it, for example: "mycoolanim.rtnn".
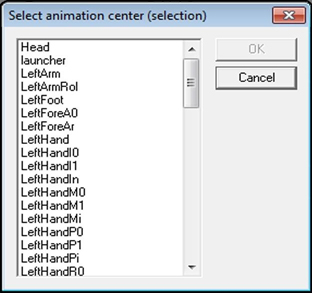
Once you save that out, this window will appear, this is basically asking you to select a bone for the root position, which is "Pelvis", so select that and press OK.
If this dialogue doesn't appear, then you should quit and give up...
I'm kidding, there is a fix, but you'll have to refer to page 6 in order to fix it.
STEP 5
Now that we have successfully exported our animation, we need to fix bone naming, to do this we open up RTMToolbox, so go find wherever you extracted that to and boot it up.
What we need to do here is press "Open .rtm", then locate the folder where you saved your animation from 02. You may get an error about linking data. I don't fully understand this yet but hopefully Thromp can shed some light on it. Once done, the frames will appear in the "Frame Count:" window. (Continued on Page 5)
Now that we can see our frames in RTMToolBox, click on Components at the top, then select "Compononent Job Manager".
This new window will appear, press "script" "Open .CompJob", then direct it to the Cornponentlobs folder in the RTMToolBox folder. Here is where you'll find Throny's very helpful little script, this bad boy will rename all of the bones correctly, it's called "3DSBoneRenarningScript.ConyJob", so select that and open it.
If done correctly, the bones that are named incorrectly will turn brown, select "Apply" at the top, then "Apply to rtml". Press ok Selected Component: to close that window down. Back on the main RTMToolbox window, go to "File","Save Rtm1 as" and replace the .rtm file you originally imported.
And done!
If you have followed these steps to the letter, then you should have a fully functioning animation that will work inside of Arrna 3, you test the animation on the Arma3 character example P3D that BI has provided.
To do this, load up the P3D in 02, go to the animation window, right click and select From Matrices", locate the newly exported .rtm you just made and load. The A3 character should now animate without any issues!
Citar:
RTM Export fix 02 has somewhat of a buggy nature, so this process can be a total pain in the ass, just follow these steps sort it out.
To fix the issue with the root bone dialogue not appearing, we need to export the animation regardless. So do that, then close 02.
Re open 02 and Import the .rtm you just exported. Click on the 0.000 LOD and create a cube in 02, F7 for the short cut. Now you need to create a named selection for it, call it whatever you want, export the rtm out of the animation window again and now the dialogue should appear, select the box name you just created and export the .rtm. as a different name as the first export.
Close down 02, now, re open 02 and re import the .rtm from the first export you did, now when you try to export it, the dialogue should appear to select a root bone, again, select "Pelvis" and export.
Follow the steps on Page 4 and you should be good to go!
Érase una vez una era oscura en la que los jugadores eran conducidos como ganado por rígidos caminos de juego. Bohemia Interactive fue la revolucionaria desarrolladora que los liberó.
Introduction Greetings everyone who will ever reach this document, I welcome you to kick back, grab a cup of tea/coffee and learn about a new(ish) workflow that Thromp, Bad Benson and I developed over the course of a few days.
To be totally fair, most of the work was done by Thromp, so he deserves the highest of praises, a thousand virgins should suffice to please him.
There are some caveats to this workflow, it can get buggy if things aren't done correctly, it will not work 100% of the time, but we have had the most success with this workflow when custom rigs are concerned, so things like dancing worms, dinosaurs, giant mecha or custom animals are entirely possible.
With a bit of luck, the community will pool together to improve this work-flow, so without further ado, let's get started!
This tutorial covers custom animations for the Arrna 3 dude, I won't be covering how to create custom skeletons here, but Bad Benson will be working on something along those lines, so expect something soon. This tutorial also assumes that you know how to animate within 3DS Max.
Código:
Make sure to move up the skeleton so the feet are at the grid origin, otherwise the character will be halfway in the ground ingame. This needs to be done on frame 1.
Then you'll need to grab the Rig I made to animate with, of course, you don't have to use my Rig, I will also provide the skeleton I had to make for .3DS compatability, which you can use to make your own rigs.
The rig and skeleton come in 2010, 11, 12, 13 3DS Max compatabilities, unfortunately I couldn't go any further back than that.
STEP 2
Load up the Rig in 3DS Max, or make your own, do your business with animation, now to export your animation you need to select all the bone names of the original skeleton.
You can make this easier by pressing "Select by name".
This button right here.
This dialogue is what will appear, next you need to select all the bones that Arma 3 recognizes for the human skeleton.
Once that's done, you need to export as .3DS, to do that, we need to go to "Export", then "Export selected" which will only export the bones that you have selected.
Under "Save as type", choose .3DS. Then call it whatever you want, save out to whatever directory you are working with. Job done
Let's move on to 02!
STEP 3 Time to load up 02, get it done! Once 02 has booted up, we need to import the .3DS file that we saved out, go to "file", "Import", then "import 3D Studio", find the .3DS you saved out of max and import it.
Once imported, this window will open, this stage is very important if you want your animations to appear.
You need to select every bone in this list, it's easier if you move the slider all the way to the bottom, click and drag left mouse button upwards and it should highlight all of the bones, then click the checkbox next to "Pelvis", that will select all of the bones for you.
Once all of your bones have been selected, there is a button you absolutely must disable before doing anything else, THIS badboy right here. Disabling this button will import all of your animated frames, rather than importing just the first frame, which is generally the "T-Pose", sometimes referred to as the ragdoll pose.
There are some other options you may want to play with to keep things clean, such as "Frames", the 0 represents your first frame, the "T-Pose", the second digits represent all the frames afterward, so if your animation is 40 frames, change the default "100" to 40 etc.
The scaling when exporting .3DS out of Max is spot on, so you won't need to change the "Master Scale" setting.
When you are ready, press "Import". You may get an error about textures, you can ignore this as it's completely unimportant.
Now that is done, the bones that you imported should appear in the main main viewport. If you haven't already configured 02 to display the animation track bar, you can do that by pressing "Window", then "Animations, and your frames will appear in a new animation window.
Highlight the first frame in this animation window and press the down arrow key on your keyboard, if you followed these steps correctly, then your animation will play in the viewport where you can see your bones.
Congrats! You have now successfully imported an animation in 02, but it's not over yet, there is still some clean up work to be done in order for things to work correctly.
STEP 4
Now, you may have noticed that some of the bones you imported have incorrect or shortened names, this is because the .3DS format is a binary format, and doesn't like long names, to fix this we must rename all of the bones that got borked in the export process, but before we do that, we must export the the animation.
In the animation window that contains all of your frames, right click anywhere in there and then select "Auto Time 1.0", I have no idea why this is needed, but Thromp told me this step was necessary, so we do it. With that done, right click in the animation window again, then select "Export Matrices" down at the bottom.
Save this out to the folder you are working with, if you get an error that says "The File name is not valid", then you need to add ".rtm" after what you call it, for example: "mycoolanim.rtnn".
Once you save that out, this window will appear, this is basically asking you to select a bone for the root position, which is "Pelvis", so select that and press OK.
If this dialogue doesn't appear, then you should quit and give up...
I'm kidding, there is a fix, but you'll have to refer to page 6 in order to fix it.
STEP 5
Now that we have successfully exported our animation, we need to fix bone naming, to do this we open up RTMToolbox, so go find wherever you extracted that to and boot it up.
What we need to do here is press "Open .rtm", then locate the folder where you saved your animation from 02. You may get an error about linking data. I don't fully understand this yet but hopefully Thromp can shed some light on it. Once done, the frames will appear in the "Frame Count:" window. (Continued on Page 5)
Now that we can see our frames in RTMToolBox, click on Components at the top, then select "Compononent Job Manager".
This new window will appear, press "script" "Open .CompJob", then direct it to the Cornponentlobs folder in the RTMToolBox folder. Here is where you'll find Throny's very helpful little script, this bad boy will rename all of the bones correctly, it's called "3DSBoneRenarningScript.ConyJob", so select that and open it.
If done correctly, the bones that are named incorrectly will turn brown, select "Apply" at the top, then "Apply to rtml". Press ok Selected Component: to close that window down. Back on the main RTMToolbox window, go to "File","Save Rtm1 as" and replace the .rtm file you originally imported.
And done!
If you have followed these steps to the letter, then you should have a fully functioning animation that will work inside of Arrna 3, you test the animation on the Arma3 character example P3D that BI has provided.
To do this, load up the P3D in 02, go to the animation window, right click and select From Matrices", locate the newly exported .rtm you just made and load. The A3 character should now animate without any issues!
Citar:
RTM Export fix 02 has somewhat of a buggy nature, so this process can be a total pain in the ass, just follow these steps sort it out.
To fix the issue with the root bone dialogue not appearing, we need to export the animation regardless. So do that, then close 02.
Re open 02 and Import the .rtm you just exported. Click on the 0.000 LOD and create a cube in 02, F7 for the short cut. Now you need to create a named selection for it, call it whatever you want, export the rtm out of the animation window again and now the dialogue should appear, select the box name you just created and export the .rtm. as a different name as the first export.
Close down 02, now, re open 02 and re import the .rtm from the first export you did, now when you try to export it, the dialogue should appear to select a root bone, again, select "Pelvis" and export.
Follow the steps on Page 4 and you should be good to go!
Érase una vez una era oscura en la que los jugadores eran conducidos como ganado por rígidos caminos de juego. Bohemia Interactive fue la revolucionaria desarrolladora que los liberó.
No puede abrir nuevos temas en este Foro No puede responder a temas en este Foro No puede editar sus mensajes en este Foro No puede borrar sus mensajes en este Foro


 This button right here.